
Our home office network had gradually grown to the point that no one could remember the IP addresses of all devices. All the connected PCs, phones, tablets, and other devices had to be assigned names so that, for instance, a phone could connect to a PC by referring to it by name. The internet has a solution for this, and it is called DNS (Domain Name System). A program titled Dnsmasq was chosen to be our local area network (LAN) solution, but it couldn’t solve our remote access problem. We wanted to access files stored on hard drives in the home office while we were out. As it turned out, Wireguard provided the solution for remote access.
Surely, I thought, a DNS resolver program Dnsmasq installed in our small office LAN and Wireguard, a peer-to-peer network security software wouldn’t work nicely together? Well, they run happily together, and provide exactly the functionality we needed.
An extra bonus from all the setup work is that magically, your internet access becomes faster. This is because Dnsmasq caches IP addresses and their domain names, saving valuable time and bandwidth when it can provide answers to address requests from its own memory.
How does it work?
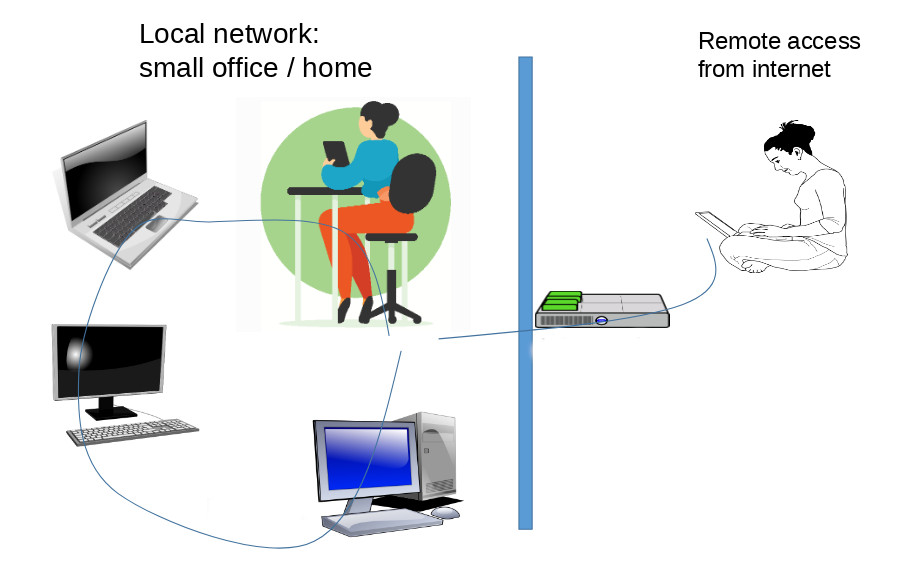
Here is the way this guide applies Dnsmasq. For instance, a tablet connected to a local network wants to access a computer connected to the same local network. The tablet can refer to the PC with a name that Dnsmasq recognizes and resolves its local IP address. If the tablet wants to connect to a site on the internet, Dnsmasq passes the address resolve request on to a public DNS server. Another use case is when the tablet is outside the local network, and makes the same request on the internet. For accessing the local network remotely, we can use Wireguard.
So, here is a how-to guide for setting up Dnsmasq for your home or small office local LAN network (Section 1), and a guide how to adjust Wireguard to enable remote access to the LAN (Section 2).
Section 1: Install Dnsmasq
Dnsmasq is open source software (by Simon Kelley) that provides essential network services for small networks: DNS, DHCP, router advertisement, and network boot. For this project, we only need DNS functionality for matching names with IP addresses in the LAN. Since our PCs are running on Debian 12 Linux, this guide refers to Debian commands.
First, designate one of your Linux, BSD or Mac computers as the server where Dnsmasq will run. The program is light on resources so the designated machine can be practically any compatible PC.
Before starting the installation make a backup copy of the file /etc/resolv.conf. We didn’t have any problems with it, or systemd-resolved process but some Linux distributions may encounter hiccups with Dnsmasq and them.
Install Dnsmasq:
apt install dnsmasq
When install command has finished, you can check it is running:
systemctl status dnsmasq
The default port Dnsmasq wants to use is 53. If you have a firewall, open that port (or configure another port in the dnsmasq.conf file).
Next, let’s specify a central list of device names and their LAN addresses that will be stored on this computer. The file /etc/hosts usually exists already on Linux computers. Open the /etc/hosts file in an editor, and insert a line for each connected device (using the actual IP addresses and device names):
192.168.1.1 garonne.hoof
192.168.1.2 mosel.hoof
192.168.1.3 douro.hoof
Hosts file needs to be updated when a new device is connected to the LAN. The extension .hoof can also be anything as long as it matches the local= directive in dnsmasq.conf.
To improve privacy of all your LAN users, adjust Dnsmasq to only use secure DNS servers to resolve public internet domain names. Create a file named, for instance, /etc/nameservers.conf. The file name will be matched with the resolv-file= directive in dnsmasq.conf. Insert a couple of lines that look like this into the nameservers.conf file:
nameserver 99.888.777.66
nameserver 66.888.777.99
As you can see the above addresses are not real, but you should replace them with addresses you get from your favorite DNS resolver. A couple of secure and privacy-focused providers are Nextdns and Quad9.
Configuring Dnsmasq server
The objective is to setup Dnsmasq so that users in the LAN can refer to devices by name, and Dnsmasq takes care of matching names with IP addresses. We will also configure Dnsmasq to cache public internet domain names locally for blazing fast response times, and to manage users’ privacy by only accessing secure DNS resolvers that don’t leak the web site names that users have visited.
Dnsmasq configuration is specified in the file /etc/dnsmasq.conf. Before editing the file, it may be a good idea to make a backup copy of it.
There is about gazillion lines in the .conf file, but right now we are only interested in a few values. Uncomment or modify the following lines:
- (this means all device names must be of format: name.extension)
domain-needed - (self-assigned names are resolved by your Dnsmasq, not passed on to the internet)
bogus-priv - (public internet domain names are resolved by DNS servers specified in this file)
resolv-file=/etc/nameservers.conf - (the extension for self-assigned names)
local=/hoof/ - (Dnsmasq responds to requests coming from these addresses)
listen-address=127.0.0.1
After changes to the dnsmasq.conf file have been saved, you must restart Dnsmasq:
systemctl restart dnsmasq
Now, you may test that both the internal LAN and public internet addresses, for instance, with ping command:
ping olympics.com
ping name-you-assigned-for-computer-in-LAN.with-extension
Configuring all LAN devices to use Dnsmasq services
Client devices connected to the LAN have to be made aware that Dnsmasq is the new DNS resolver both for addresses in the LAN and in the public internet.
Note that the following instructions apply to PCs and devices that are not running a VPN, like Wireguard (see the last section of this guide for information about setting up Wireguard with Dnsmasq).
Windows PC:
Open the Settings app, Network, and go to Properties (of the active connection). Push Edit button next to DNS server assignment title. Enter the internal LAN address of the Dnsmasq computer which often is something like 192.168.1.1 or 10.0.1.1.
Android:
Open the Settings app, and go to Network & Internet – Internet. Tap the Settings icon in the active Wifi hotspot. Tap the pencil for edit mode. Open Advanced – IP Settings – Static. DNS 1 field: enter the internal LAN address of the Dnsmasq computer.
Linux computer:
If your Linux computer features a graphical desktop software, you can find the Network section in the Settings app, where you can replace the existing DNS server address. Enter the Dnsmasq computer’s LAN address into the DNS field. If you are on the command line, here is a page with step-by-step instructions.
MacOS: here is a guide for changing the DNS address on a Mac.
Once the new DNS address has been set, it is time to test if Dnsmasq provides requested services for client devices. Ping is an easy on the command line, try:
ping name-specified-for-the-dsnmasq-computer
For instance: ping garonne.hoof
Note that some operating systems, like Windows and Android tend to cache the DNS server address it has used before. This may cause a delay before the new DNS address is active.
Section 2: Add remote access to the LAN with Wireguard
Now that you have a LAN network where PCs and other devices have names, you may want to access the LAN outside its physical location. There are many methods for establishing remote access functionality to a home network or a small office LAN. I am going to introduce a way that requires two things:
- You need access to a computer that is on the public internet, and whose configuration you can adjust. This is often a web server or a VPS running at a hosting provider’s premises. For this project, the role of this computer is to allow you to connect to your LAN anywhere in the world.
- You already have Wireguard running on your devices for secure communications, or you can set it up. In many cases, Wireguard is used like a VPN (Virtual Private Network) only, but it can be used as a secure way to provide remote access as well. Here is a guide for installing and configuring Wireguard so that it provides both VPN and remote access functions.
To enable remote access with Wireguard from your phone, tablet, or laptop to your LAN, the following things must be set up:
- When your devices and computers are running Wireguard, their IP addresses are usually something like 192.168.2.2 or 192.168.2.10.
- Edit the /etc/hosts file on the Dnsmasq computer to reflect the Wireguard addresses of devices connected to the LAN. A name and Wireguard address for the computer on the internet must be inserted here as well.
- Add the Wireguard address of the Dnsmasq computer into the /etc/dnsmasq.conf file. If the Wireguard address of the Dnsmasq computer is 192.168.2.1, the listen-address line should be:
listen-address=127.0.0.1,192.168.2.1 - On all client devices, change the DNS server to the Wireguard address of the Dnsmasq computer. For instance, 192.168.2.1 if that has been assigned to the Dnsmasq computer.
The result is that all devices on the LAN and the one in the public internet can connect with each other locally and remotely. Security is provided by a correct Wireguard configuration. Every connected device must have valid encryption/decryption keys. No one can access the LAN from outside without the keys.